
October 7, 2026
Silicone Mold from STL: Free 3D Printed Mold Generator
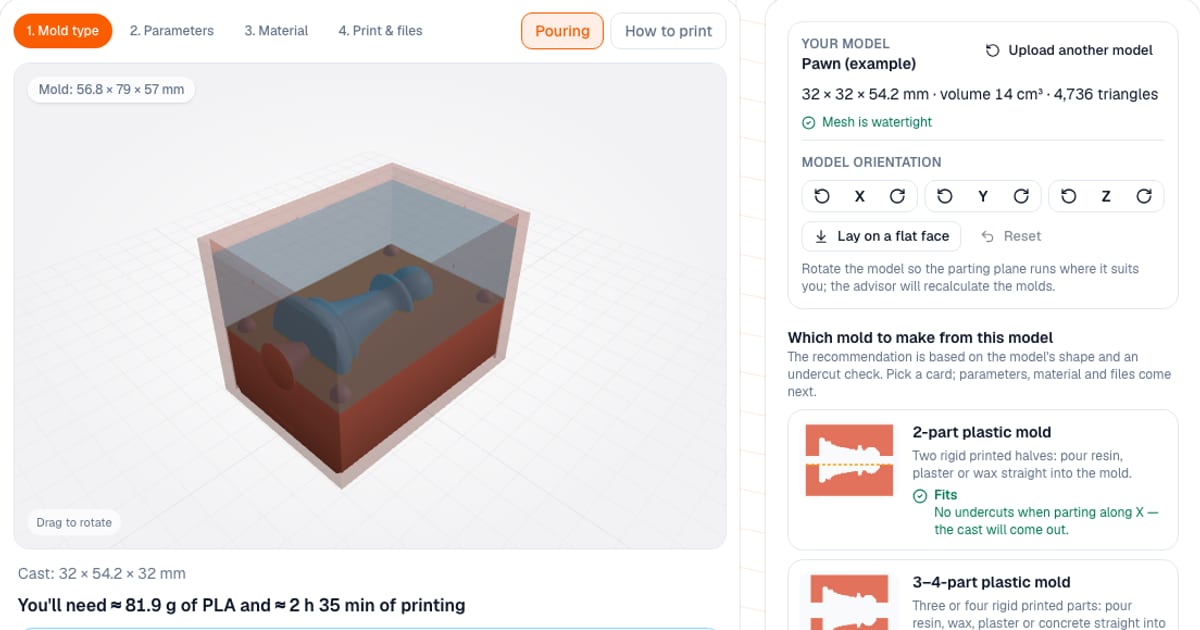
To make a silicone mold from an STL, upload the model to the mold generator: it checks the mesh, recommends a mold type for that specific model, and builds the printable parts. Output is STL (one part at a time) or 3MF (the whole set). It is free and runs in your browser, your model file never leaves it. You can configure and preview right away; downloading the parts needs a free sign-in by email.
One important note up front: the tool is a demo version. I cannot check every mold by hand, and printing a mold can use a lot of plastic. Open the files in your slicer and check dimensions, wall thickness, undercuts and plastic use before printing. Downloads unlock only after you tick "I will check the model in my slicer before printing", and file names carry a _DEMO suffix.
Which mold fits my model?
Upload STL, 3MF or OBJ (up to 60 MB and 500,000 triangles), or try the built-in sample, a chess pawn. The tool shows size, volume and whether the mesh is closed, detects undercuts, and rates each mold as good, with caveats, or not suitable, marking one as recommended.
| Mold | Best for | You get |
|---|---|---|
| Open-top silicone | A model standing on a flat base (flat area at the bottom is over half of its footprint) | A pouring box; the flat face becomes the pour opening |
| Two-part silicone | Round, bulky models without a flat base, or models with undercuts | Box, parting bed, sprue and vent formers |
| Two-part plaster | Only models without serious undercuts (wax, concrete, slip) | Same parts; thicker plaster layer and bigger keys by default |
| Two-part plastic | Only without serious undercuts; fastest route | Two printed halves with a cavity: pour resin, plaster or wax straight in |
| 3-4-part plastic | The model won't come out of two halves, but each part can come off in its own direction | Three or four printed parts with a cavity, keys and strap grooves: pour straight in |
A rigid two-piece mold cannot release a cast that locks in place, for example a pawn whose head is wider than its neck. With serious undercuts the two-part plastic and plaster molds are blocked from download. The tool then checks whether the cast comes out of 3-4 rigid parts, and if not, suggests silicone instead. Undercuts are highlighted in red.
How does the two-part silicone mold work?
It is the most versatile option. You get three kinds of parts:
- A box (formwork) around the model, solid or split with clamps.
- A parting bed: a plate with a pocket that matches the lower half of the model up to the parting line, with alignment keys and grooves. It prints pocket-up without supports.
- Sprue and vent formers: cones that stay in the silicone through both pours, so the channel is intact after demolding.
You place the model in the bed, pour half one, flip it, remove the bed, apply mold release (silicone sticks to silicone permanently) and pour half two. A step-by-step guide with the amount of material for each half is on the page and in a TXT file, which downloads without sign-in because it contains no geometry.
How does the 3-4-part plastic mold work?
It is a rigid mold for resin, wax, plaster and concrete, for models that won't come out of two halves because they have undercuts above and below any parting plane. Two perpendicular planes split the mold block:
| Layout | Parts |
|---|---|
| 3 parts, lid on top | The whole top comes off upward; the bottom is two halves that slide out sideways |
| 3 parts, base below | The whole bottom comes off downward; the top is two halves that slide out sideways |
| 4 parts | Two parts on top and two below, each coming off in its own direction |
The tool tries the axes and positions of both planes and checks undercuts for each part separately, given the direction it comes off. The winner is the layout where no part catches on the cast, with as few parts as possible. By hand you can choose 3 or 4 parts, the axes, and slide both planes; the preview pulls the parts apart in the directions they come off, with a list like "Part 2, bottom, -X side: comes off sideways".
What else it adds:
- Cone keys only on seams where the part that comes off first moves straight away from the seam; otherwise a key would stop it from sliding.
- Sprue and vents run vertically, through a part that comes off upward, or along the seam between two parts so each part pulls away from its half of the channel.
- Strap grooves run around the mold: one rubber band, zip tie or strap presses the parts against both planes at once.
- Part numbers are pressed into the front face in take-apart order: part 1 comes off first.
- No supports: each part prints with its parting face up and its outer face on the bed.
If the cast won't come out even of 3-4 parts, the tool says so ("you need a silicone mold") and download is blocked. Instructions (assembly on the keys, clamping, pouring with the material amount, take-apart order) are on the page and in a TXT file.
What can I configure?
Ranges come from the tool:
| Parameter | Range | Default |
|---|---|---|
| Silicone layer around the model, open box | 5-25 mm (usually 8-15) | - |
| Layer around the model, two-part mold | 5-40 mm | 10 mm silicone, 20 mm plaster |
| Box wall, open mold | 1.2-6 mm | - |
| Box wall, two-part mold | 1.6-6 mm | - |
| Sprue | 3-16 mm diameter | 6 mm silicone, 10 mm plaster |
| Vents | 0-4, 2-5 mm diameter | - |
| Wall of plastic mold around model | 6-40 mm | 12 mm |
| Plastic mold sprue | 3-12 mm diameter | 6 mm, two 2 mm vents |
| 3-4-part mold: wall, keys | 6-40 mm; cone 4-16 mm diameter | 12 mm; 8 mm, 0.2 mm clearance |
The parting plane is chosen automatically (least undercuts) or set by hand. The open box has fill-level marks, strap ears and a dust lid; the plastic mold has alignment keys, M3 or M4 bolts and pry slots for opening the halves. You set the model's orientation right in its card after upload: rotate it 90° around X, Y or Z, or press "Lay on a flat face" and the tool finds the largest flat face, sets the model down on it and squares it to the axes. This helps when a file was saved tilted: parting planes run along the axes, and the recommendation is recalculated for the rotated model.
What if I have no model?
There are compact parametric molds for simple jobs: a coaster or tile (circle, square, hexagon, heart), soap, chocolate, ice (cubes or hemispheres), candles (cylinder, cone, two-half sphere, wick hole), a concrete planter with drainage, and an epoxy tray. You enter dimensions by hand and the material estimate works the same way.
How much material will I need?
The tool shows the cavity volume minus the model and formers. Choose the cast material: silicone, resin or epoxy, plaster, concrete, wax, soap base, chocolate or water. Two-part materials get an A:B split (1:1, 2:1, 10:1, 20:1); plaster gets dry powder plus water. Default densities: silicone 1.1 g/ml, plaster 1.7, concrete 2.2, wax 0.9. Waste allowance is 0, 5, 10 or 15 percent. It also shows the plastic mass for printing the mold itself and whether each part fits your print bed.
How should I print the mold?
- Plastic. PLA is enough for silicone, plaster and concrete. For hot wax and soap base use PETG or ASA: PLA softens from about 55-60 C.
- Nozzle and layers. 0.4 mm nozzle, 0.12-0.16 mm layers: every layer line shows on the cast.
- Walls. 3-4 perimeters so the mold does not leak. Test it with water and dry it thoroughly.
- Release agent. Resin and epoxy bond to PLA and PETG, plaster to dry plastic. You need a release agent.
- Pouring silicone. Pour a thin stream into a corner from 20-30 cm up so bubbles pop on the way down. Fix the model in place: silicone is heavier than plastic and it will float.
What mistakes should I avoid?
- Pouring chocolate or ice into a printed mold. Printed plastic is not food safe and layer pores harbor bacteria. Use a master and food-grade silicone. This applies to the printed mold itself.
- Skipping release on half A before the second pour, which fuses the halves.
- Skipping a test. Platinum silicone may fail to cure on some resins and modeling clay: test on a scrap.
- A holey mesh. Mesh errors make the cavity estimate inaccurate; repair the file first in STL Repair.
- Forgetting the slicer. This is a demo: open the parts and check them before printing.
How does this compare with other options?
For a one-off you can model the formwork yourself in Fusion 360, Blender or Tinkercad. That gives full control but takes time and skill. The tool is faster for the typical case: an uploaded file turns into a set of parts, an undercut check and a material estimate. It splits a rigid mold into at most 4 parts and only with planes along the model axes; for a complex sculpture that needs an angled parting line or five or more parts, use a silicone mold or model the formwork in CAD.
Whose models can I copy?
Only models you have the rights to. Responsibility for copying other people's work is yours; see is it legal to sell prints from downloaded STL files.
You can inspect your model first in the 3D model viewer, or check mesh problems with this guide to broken STL files.
Frequently asked questions
- How do I make a silicone mold from an STL file?
- Upload the STL, 3MF or OBJ to the mold generator, pick the open-top silicone mold or the two-part silicone mold, and download the printable parts. You print a box (and a parting bed), fix your model inside, pour two-part silicone, and get a flexible mold.
- How do I 3D print a mold for silicone casting?
- The printer makes the formwork, not the silicone itself: a box around the model and, for a two-part mold, a parting bed and sprue formers. You pour silicone into that formwork and peel it off once cured.
- What is a 3D printed mold generator?
- It is a tool that builds a casting mold around your model. This one can print a rigid two-part mold (for models without undercuts) or a master box you cast a flexible silicone mold from, and it estimates silicone, plaster and plastic use.
- How much silicone do I need for a mold?
- The tool takes the cavity volume of the box minus your model, separately for each half of a two-part mold. Silicone is about 1.1 g/ml, so 100 ml is roughly 110 g. You can add a waste allowance of 0, 5, 10 or 15 percent; the default is 10.
- Can I cast chocolate or ice in a 3D printed mold?
- Not in the printed mold itself: layer lines leave pores and printed plastic is not food safe. Print a master, cast a food-grade silicone mold from it, and pour chocolate or water into that.
- Why won't the tool let me download a rigid mold for my model?
- The model has serious undercuts, so the cast cannot come out of the rigid mold parts, and download is blocked. If it won't come out of two halves but does come out of three or four parts, the 3-4-part plastic mold works; if not even that, use silicone, because flexible silicone peels off undercuts.
- Can I 3D print a rigid mold with three or four parts?
- Yes. A 3-4-part plastic mold is for models that won't come out of two halves: two perpendicular planes split the mold block, and each part comes off in its own direction, up, down or sideways. The generator picks the planes and layout, checks every part for undercuts, and adds keys, a sprue, vents, strap grooves and part numbers in take-apart order.
- What does demo version mean for the mold generator?
- Molds are not checked by hand and printing a mold can use a lot of plastic. Open the file in your slicer and check size, walls and plastic use first; downloads need a confirmation that you will do that. File names end in _DEMO.