
October 7, 2026
Gridfinity Generator Online: Baseplates Sized to Your Drawer
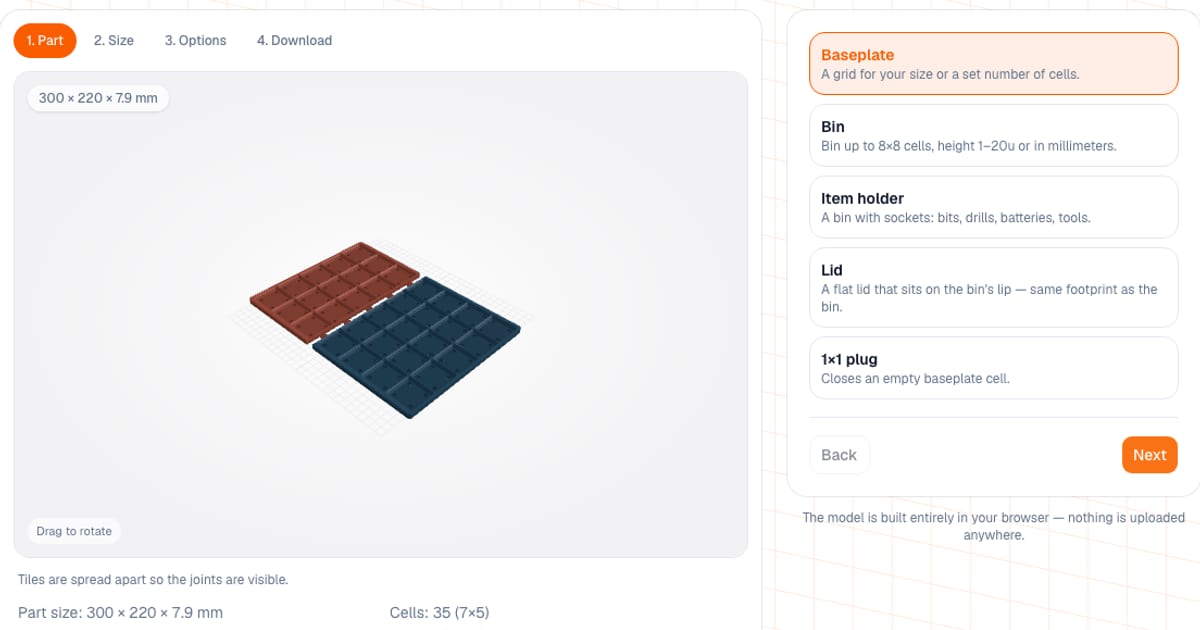
A Gridfinity generator works out how many 42 mm cells fit your drawer and builds the baseplate so the leftover is not wasted. In the Gridfinity Generator you enter the size of a drawer or shelf in millimeters and get an STL or 3MF: baseplate, bins, lids and plugs. It is free and runs in your browser; setup and preview need no sign-up, and downloading needs a free sign-in with an email address.
Gridfinity used to be a mode inside the box generator and is now its own tool. The main job here is fitting: a drawer is rarely a multiple of 42 mm, and a baseplate wider than your bed has to be cut. That is what this tool does. The tool works in millimeters; for a drawer measured in inches multiply by 25.4.
What are the Gridfinity dimensions in this generator?
Dimensions follow the open specification by Zack Freedman. One deviation: the top of the foot is 0.05 mm narrower and the baseplate opening is 41.8 mm, otherwise the outlines would coincide and the grid would not close.
- Grid pitch 42 mm; a 1 x 1 bin is 41.5 mm with clearance.
- Height in 7 mm steps ("u"); the stacking lip adds another 4.4 mm.
- 6 x 2 mm magnets (6.5 x 2.4 mm hole) and M3 screws.
Example: a 2 x 2 bin at 6u comes out at 83.5 x 83.5 x 46.4 mm, about 65 g by the tool's estimate.
How do you calculate a baseplate for your drawer?
- Open the Gridfinity generator and choose Baseplate on the Part step.
- On the Size step choose Fit to size (mm) and enter the free width and depth of the drawer, from 40 to 700 mm.
- Leave the edge tolerance at 0.5 mm or change it (0-3 mm). Cells per side = the whole part of (size - tolerance) / 42, up to 16.
- Choose what to do with the leftover, and the bottom (tables below).
- Pick your printer bed, then on the Download step get an STL, a 3MF or a set of tiles.
Example. A 508 x 406 mm drawer (20 x 16 in) gives 12 x 9 cells with a 4 x 28 mm leftover. A 380 x 290 mm drawer gives 9 x 6 cells; along the width the leftover of 2 mm is below the 3 mm threshold, so a strip cannot be printed and the tool leaves a gap, while along the depth the leftover is 38 mm. Enter 84 mm with a 0.5 mm tolerance and you get one cell; with a tolerance of 0 you get two.
What to do with the leftover:
| Mode | What it does | When to pick it |
|---|---|---|
| Edge gap | grid centered, leftover stays empty | you do not mind some slack; switches on by itself if the leftover is under 3 mm |
| Fit frame | solid strip around the edges, baseplate size equals yours to 0.1 mm | the baseplate should not slide around in the drawer |
| Filler plate | the leftover as one plate on the right and back, solid or with a pocket for foam or EVA | you want to store small items or an insert in the leftover |
The filler pocket is made when the strip is at least 6 mm wide, with 1.5 mm margins and a 1.2 mm floor.
Baseplate with a bottom or without: which to choose?
| Option | Floor under the cells | Baseplate height |
|---|---|---|
| No bottom, grid only | none | 4.65 mm |
| With bottom, no magnets or screws | 1.2 mm | 5.85 mm |
| With bottom and M3 screws | 2.4 mm | 7.05 mm |
| With bottom and 6 x 2 mm magnets | 3.2 mm | 7.85 mm |
On top of a bottom you can add lightweight cut-outs (between the magnets), a thick floor (+2 mm) and rounded outer corners. The plastic difference is large: a 4 x 4 cell baseplate (168 x 168 mm) weighs about 111 g with a bottom and magnets and about 26 g without a bottom by the tool's estimate. No bottom prints faster, but the bins do not rest on a solid floor; the frame and filler still stay.
How do you split a baseplate for your printer bed?
A baseplate bigger than your bed is split on its own, only along cell boundaries, so no cell is ever cut. Beds in the list: Bambu Lab A1 mini (180 mm), A1 / P1 / X1 (256 mm), Creality Ender-3 / K1 (220 mm), Elegoo Neptune 4 Pro (225 mm), Prusa MK4 (250 x 210 mm), Voron 2.4 350, or your own size from 100 to 1000 mm.
With the defaults (fit frame, with a bottom, dovetail joints) the 508 x 406 mm drawer gives:
| Bed | Tiles |
|---|---|
| 256 x 256 mm | 6 tiles (3 x 2) |
| 250 x 210 mm (Prusa MK4) | 6 tiles (3 x 2) |
| 220 x 220 mm | 9 tiles (3 x 3) |
| 180 x 180 mm | 9 tiles (3 x 3) |
The leftover mode matters: with an edge gap instead of a fit frame the same drawer on a 220 mm bed needs 6 tiles, not 9.
Joints between tiles:
- Dovetail. A tab under one tile drops into a socket in the next: it holds both ways and needs no extra parts. Needs a bottom.
- Pins. Holes in the edges, pins of 1.75 x 12 mm printed separately or cut from 1.75 mm filament. The only option without a bottom.
- Magnets. Pockets for magnets (6 x 2 mm by default) open at the bottom, glued in pairs. Needs a bottom.
The joint clearance defaults to 0.15 mm per side (0.05-0.5 mm): if it does not go in, increase it; if it wobbles, decrease it. Tiles are numbered (A1, A2, B1...): the number is engraved underneath where there is room and is always in the file name. Output: a 3MF with all tiles on the bed (each a separate part), a ZIP with an STL for each tile, the pins and the diagram, and an assembly diagram PNG.
Which bins can you make?
| Parameter | Range |
|---|---|
| Bin size | 1-8 cells per side |
| Height | 1-20u or 7-145 mm total height (rounded up or down), default 6u |
| Wall | 0.8-2.4 mm, default 1.2 |
| Dividers | up to 10 per axis |
| Options | stacking lip, magnets, M3 screws, label shelf (off by default), scoop |
| Lite | 0.8 mm walls and dividers, minimal floor: less plastic but weaker |
Each bin has a matching lid, and there is a 1 x 1 plug for an empty baseplate cell.
The Items part gives a bin with pockets:
| What you store | Pockets | Default tolerance |
|---|---|---|
| 1/4" bits | 6.35 mm hex, 10-15 mm deep | 0.2 mm |
| Drills | from a list of diameters separated by spaces | 0.2 mm |
| Screwdrivers, round tools | round, 1-80 mm diameter | 0.5 mm |
| Tweezers, pliers | outline: rectangle or teardrop | 1 mm |
| Batteries | AA 14.5 x 50.5; AAA 10.5 x 44.5; 18650 18.6 x 65.2; CR2032, CR2025, 9V | 0.3 mm |
| Pencils, markers | round | 0.5 mm |
Pockets are laid out in a grid and the bin size is picked to fit the set: the smallest bin that holds it, up to 8 x 8. If the set does not fit or items stick out above the rim, the tool warns you.
How do you print Gridfinity?
- Nozzle and layers. 0.4 mm nozzle, 0.2 mm layers. A 1.2 mm wall is three perimeters.
- Baseplate. Print it with the openings up. Magnet holes are bridged over, no supports needed.
- First layer. It decides everything: the baseplate must lie flat or the bins will rock.
- Item bins. 10-15% infill; the insert is simply the body of the bin. Print a small 1 x 1 bin with a couple of pockets first and check the fit: tolerance depends on the printer and plastic.
- Tiles. Print two tiles and test the joint before the rest. Glue the magnets into one tile first, put the magnets for the neighbour against them, and the polarity sorts itself out.
- Do not scale the model in the slicer: the 42 mm pitch and joint clearances would stop matching.
Common mistakes
- Forgetting the tolerance. An 84 mm drawer at 0.5 mm tolerance gives one cell, not two.
- A leftover under 3 mm. A strip that narrow cannot be printed; the tool leaves a gap on that axis.
- The wrong bed. The default is a 256 x 256 mm bed: on a 180 mm printer that gives tiles that will not fit.
- Magnets without a bottom. In No bottom mode magnets, screws and lightweight cut-outs are unavailable, and only pins remain as joints.
- Narrow tiles. A tile one cell wide is fragile, and the tool warns about it.
How is this different from other Gridfinity generators?
- Zack Freedman's original files and ready models on Printables are the better choice when you want the proven standard baseplate or a popular bin.
- Other browser generators, for example Gridfinity Layout Tool, also output STEP and work offline. If you need STEP for finishing in CAD, look there. Here one part or one set of tiles is built at a time.
- CAD and scripts (Fusion, OpenSCAD, CadQuery) give you any custom bin, but take time.
This tool is handier when you have a specific drawer with dimensions in millimeters, need to close the leftover and split the baseplate for your own bed. For boxes with lids and no grid there is the box generator, and for wall storage the SKÅDIS panel. If you printed a baseplate and want to know what it cost, use the cost calculator.
Frequently asked questions
- How do I size a Gridfinity baseplate to my drawer?
- Enter the inner width and depth of the drawer in millimeters. Cells per side = the whole part of (size minus tolerance) / 42, with a default tolerance of 0.5 mm. The tool leaves the leftover as an edge gap, closes it with a fit frame or fills it with a filler plate.
- Can I print a Gridfinity baseplate without a bottom?
- Yes. The No bottom, grid only mode makes the cells go all the way through: the baseplate is 4.65 mm tall and uses several times less plastic than one with a floor. Magnets, screws and a thick floor are not available in this mode because they need a floor.
- What if my Gridfinity baseplate is bigger than my printer bed?
- Pick your bed from the list or enter its size: a baseplate larger than the bed is split into the fewest tiles along cell boundaries. Joints are your choice: dovetail, pins or magnets. Tiles are numbered, and you get an assembly diagram PNG and a 3MF with all tiles laid out on the bed.
- Are the generated parts compatible with standard Gridfinity?
- Yes. Dimensions follow the open specification by Zack Freedman: 42 mm pitch, height in 7 mm steps, standard feet and lip. There is one small deviation (the top of the foot is 0.05 mm narrower) so the grid outlines do not coincide; bins sit on any Gridfinity baseplate.
- How do I make a Gridfinity bin for bits, drills or batteries?
- Choose the Items part: 1/4 inch bits, drills from a list of diameters, screwdrivers, tweezers, AA, AAA, 18650, CR2032, CR2025 and 9V batteries, pencils or a plain rectangular pocket. Set the count, tolerance and depth, and the bin size can be picked automatically.
- Do I need magnets for Gridfinity?
- No. Holes in the bins and baseplate are sized for 6 x 2 mm magnets, but everything works without them. The joints between baseplate tiles can use magnets of 3-10 mm diameter.
- Is the Gridfinity generator free?
- Yes, and the calculation runs in your browser. Setup and preview need no sign-up; downloading an STL or 3MF needs a free sign-in with an email address.