
October 7, 2026
SKÅDIS Generator for 3D Printing: Panel, Hooks and Holders
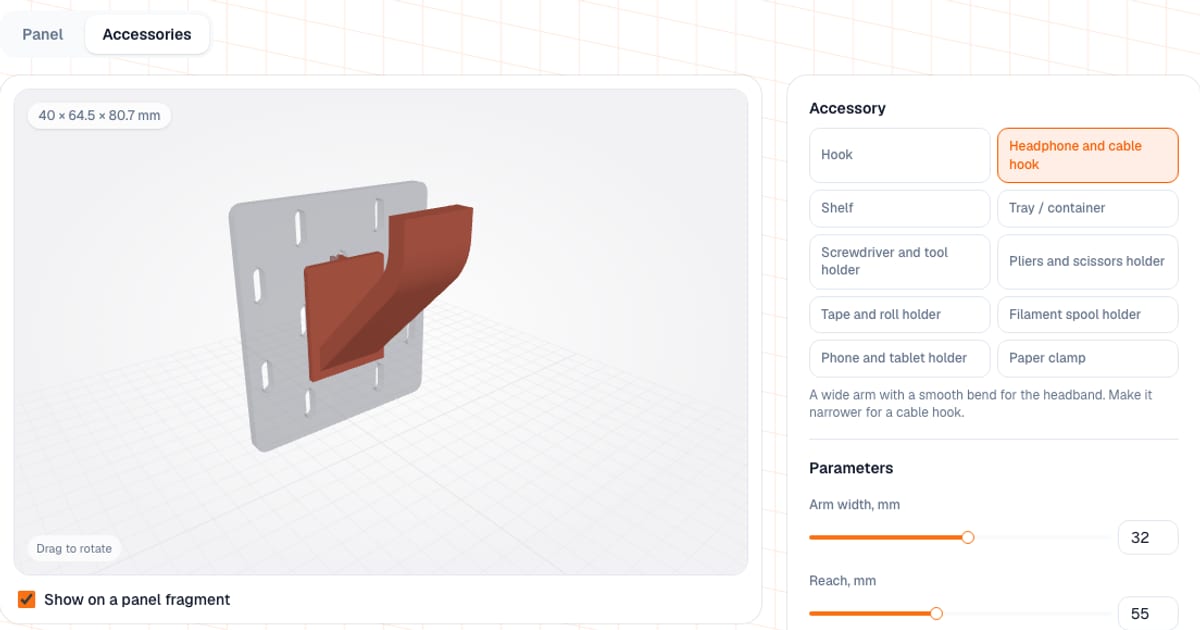
The SKÅDIS generator builds two kinds of parts in your browser: a printable panel with slots like the IKEA SKÅDIS pegboard, and accessories for it, namely hooks, shelves, trays and tool holders. The result is an STL or 3MF. The tool is free: setup and preview need no sign-up, and downloading a file needs a free sign-in with an email address. Accessories attach with springy snap clips and print without supports.
The model is built in your browser and never leaves it. A link with ?acc=tray opens the accessory you want straight away: hook, headphones, shelf, tray, tools, pliers, tape, spool, phone or clamp.
What are the SKÅDIS dimensions and where do the numbers come from?
IKEA does not publish a drawing of the slot, so the numbers in the tool come from several independent community measurements, and they all agree.
| Parameter | Value |
|---|---|
| Slot | vertical, 5 mm wide x 15 mm tall |
| Pitch | 40 mm in a column, the neighboring column shifted by 20 mm (staggered) |
| Board thickness | 5 mm |
| Slot edge rounding on IKEA boards | about 1 mm |
| Clip finger | 1.5 mm, length 12 mm, snap bump 0.6 mm per side |
Real slots are slightly narrower than nominal, so measure your own board with calipers and adjust the fit if needed. The clip profile follows the open SKÅPA project: the fingers are springy, go straight into the slot and snap behind the rear edge. Standard IKEA boards are 36 x 56, 56 x 56 and 76 x 56 cm.
How do you print a SKÅDIS panel?
On the Panel tab the size is set in 40 x 40 mm cells, from 1 to 10 per side. The slots are staggered and the outermost ones sit half a pitch from the edge.
| Size | Dimensions | Slots | Mass (tool's estimate) |
|---|---|---|---|
| 3 x 3 cells | 120 x 120 mm | 13 | about 74 g |
| 5 x 5 (default) | 200 x 200 mm | 41 | about 180 g |
| 6 x 6 | 240 x 240 mm | 61 | about 250 g |
The mass estimate assumes PLA and 15% infill; your slicer gives the exact figure. What else you can set:
- Thickness 3-8 mm, default 5 mm like IKEA.
- Back frame 0-12 mm, default 4 mm. The tails of the clips stick out of the slot by 2-3 mm and would hit the wall without it.
- Mounting holes in the corners: 3-8 mm diameter, default 4.5 mm.
- Shrinkage compensation for the slots 0-0.5 mm, default +0.15 mm: printed holes come out slightly narrow.
- Pitch and slot size can be changed, but only for your own system, not for IKEA.
The panel prints smooth side down with the frame on top, no supports. A panel wider than the bed is not split: 6 x 6 cells (240 mm) still fits a 256 mm bed, 7 x 7 does not. Pick your printer in the list and the tool warns you if the part does not fit. A full IKEA-size 560 mm board is beyond this tool (the maximum is 400 mm), so it is meant for smaller custom panels.
Which accessories can you make?
Default sizes and the mass estimate come from the tool itself (PLA, 15% infill).
| Accessory | What you can set | Default | Mass |
|---|---|---|---|
| Hook | up to 4 arms, straight or J-shaped, reach 20-100 mm, arm angle 45-65 degrees | 1 arm, reach 40 mm | about 8 g |
| Headphone and cable hook | arm width 12-50 mm, reach 30-90 mm, bend radius | 32 mm arm | about 23 g |
| Shelf | width 24-240, depth 20-160, rim 0-40 mm, rim at the front or all around | 79 x 60 mm | about 30 g |
| Tray | width 24-240, depth 20-160, height 15-120 mm, dividers up to 6 and up to 8 | 79 x 60 x 52 mm | about 61 g |
| Screwdriver and tool holder | 1-16 holes, 3-40 mm diameter, depth 10-80 mm, 1-3 rows | 6 holes of 8 mm | about 40 g |
| Pliers and scissors holder | 1-12 slots, width 3-40, length 10-80 mm | 3 slots | about 41 g |
| Tape holder | axle diameter 14-80, length 15-90 mm, end lip 0-4 mm | 26 x 40 mm | about 17 g |
| Filament spool holder | axle diameter 30-70, length 30-110 mm | 50 x 70 mm | about 62 g |
| Phone and tablet holder | width 50-200 mm, device thickness 5-25 mm, cable slot | 85 mm, device 10 mm | about 35 g |
| Paper clamp | width 20-150, capacity 1-15 mm, tongue 1.2-3 mm | 60 mm, stack 6 mm | about 23 g |
For a spool, make the axle 1-2 mm narrower than the spool hole, which is usually 52-56 mm. A tape holder axle should be 0.5-1 mm smaller than the core.
How does a part attach to the panel?
Each mounting point is a pair of springy fingers with barbs. The lower edge of the slot carries the weight and the barbs behind the rear edge stop it pulling out. The plate width follows the grid: k x 40 - 1 mm, one clip per cell. Rows of clips sit 40 mm apart vertically, and a second row appears from a plate height of 52 mm. The limit is 8 clips per row and 4 rows.
The Clip fit block sets the clearance (0-0.6 mm, default 0.1), the barb bump (0.2-0.7 mm, default 0.6), the board thickness (3-8 mm) and the slot edge rounding (0-1.5 mm; IKEA is about 1, a printed panel 0). If the part hangs on a printed panel from this same tool, set the rounding to 0 and the same thickness.
How do you print accessories so they hold?
- Position. Print as shown: the plate stands upright and the clips point backwards. The fingers work along the layers, the hook arm runs up at 45 degrees, a tape axle lies as a teardrop with 45-degree sides, and no supports are needed.
- Profile. 0.2 mm layers, 3 perimeters or more. PETG is more flexible than PLA and lasts longer under the snaps.
- Test the fit. Print the smallest part first. Too tight: increase the fit clearance. Loose: decrease it.
- Installing. Push the clips straight into the slots until they click and remove them with even force.
- Scale. Never scale the part in the slicer: the grid pitch and clip fit would stop matching.
Common mistakes
- One clip on a heavy item. If a part has a single clip, the tool warns that it will hold only light things. Make the plate wider or taller.
- Scaling in the slicer. Any shrinking or stretching shifts the pitch between the clips: at a 40 mm pitch two percent is 0.8 mm.
- A panel without a frame on a wall. The clips will hit the wall. Keep the 4 mm back frame.
- Heavy loads without a test. The snap force and the load capacity on a real board have not been measured, and that is an honest limitation. For heavy tools use original IKEA hooks or test under load.
- A hook "in mid-air". A downward tip cannot be printed without supports, so the arm runs upward at an angle.
What is better: this generator, ready models or original IKEA accessories?
- Original IKEA accessories are a ready, proven option. If you need an ordinary hook or shelf, buying one is more reliable than printing.
- Ready models on Printables, MakerWorld and Thingiverse fit when you want exactly that format and the size is not critical. There are many, but their parameters are fixed.
- This generator is handy when you need your own size: a holder for your set of bits, a spool with your hole diameter, a tray of the width you need.
- SKÅPA is an open project for SKÅDIS accessories: the clip here is built on its profile. Worth a look as well.
For boxes and containers on shelves see the box generator, and for drawers with a grid the Gridfinity generator. The Estimate the cost button passes the part mass to the cost calculator.
Frequently asked questions
- How do I 3D print a SKÅDIS panel and hooks?
- Open the generator, set the panel size in 40 mm cells on the Panel tab, pick a hook, shelf, tray or holder on the Accessories tab and download the STL or 3MF. Setup and preview are free with no sign-up; downloading needs a free sign-in with an email address.
- Will a printed accessory fit a real IKEA SKÅDIS board?
- The dimensions come from several independent community measurements, because IKEA publishes no drawing: a vertical 5 x 15 mm slot, 40 mm pitch with a 20 mm offset, 5 mm board thickness. The clips are springy, but print one part before a big batch and adjust the fit clearance if needed.
- What SKÅDIS accessories can the generator make?
- Ten kinds: a hook (up to 4 arms), a headphone and cable hook, a shelf, a tray with dividers, a screwdriver and tool holder, a pliers and scissors holder, a tape holder, a filament spool holder, a phone and tablet holder and a paper clamp.
- How much weight can a printed SKÅDIS hook hold?
- I have not measured the load capacity on a real board, so I will not promise a figure. The lower edge of the slot carries the weight, and the number of clips grows with the width and height of the plate: for heavy loads make the part wider and taller so it gets more clips.
- Can I print the SKÅDIS panel itself?
- Yes. The Panel tab builds a plate with SKÅDIS slots up to 10 x 10 cells of 40 mm, so up to 400 x 400 mm. The model is not scaled to your bed; if it does not fit you get a warning and have to make the panel smaller.
- Why snap clips instead of ordinary hooks with a bend?
- A clip goes straight into the slot and snaps behind the rear edge, and its fingers print upright, along the layers, with no supports. A hook bent downward cannot be printed without supports, and a vertical peg snaps along its layers.
- Can I scale a SKÅDIS part in my slicer?
- No: the 40 mm grid pitch and the slot width have to match the clips. If a part does not fit your bed, reduce its size with the parameters in the generator.